By Bet-TAY, Special Features Editor
Posted June 20th, 2009.
The digital camera sensor is where performance and the environment intersect. If you own a digital camera, it probably needs cleaning. But if you are trying to save money and keep spending to a minimum, professional sensor cleaning is probably not a high priority. But the longer we wait to clean the sensor, the harder it is to remove the dust and grime.
I am known in the Bare Feats Lab as one who stretches the limits -- sometimes with negative results. But after reading about all the mishaps and fuss that goes with flammable liquid sensor cleaning, I thought that the DRY LensPen method would be the best. Everything I read has a "disclaimer" stating that you can damage and misalign the sensor if I attempt to clean it myself. It's like the clothing label, "DRY CLEAN ONLY." Well, that just makes me want to do it myself all the more! So with data information read, tools assembled, and dirty digital sensors, I embarked on my first sensor cleaning.
My experience with cleaning my camera lenses with a LensPen was so positive that I wanted to know all about other products created by International Parkside Products, Inc. Their new SensorKlear Combo Kit that includes the newly designed SensorKlear Pen and lighted SensorKlear Loupe is the latest addition to their product line. The $79.95 unit is pricey, but pays for itself with one or two cleanings. The charge for digital sensor cleaning is between $60 and $80. With two digital Nikon sensors to clean, this means I save $60.05 or $80.05, if I don't damage the sensors.

Image of Dirty Sensor (note the various spots)
The Image of the Sensor Dirt
Before cleaning, I took a photograph of the sky with my Nikon D200 fitted with a 18-70 mm lens set at f/11 on manual focus.
In Photoshop CS4 I changed the mode to black and white and lightened the image to see the dirty areas better.
View the image at 100% in a RAW or JPEG format to see ALL the dirty areas.
Photoshop's Hand Tool will make it easy to scoot around the entire image to see the dust particles and spots. Keep in mind that the image is inverted and reversed to what you will be cleaning on the sensor.
Nikon D200 Dust Off Ref Photo Tool
The Nikon D200 also has a Dust Off Ref Photo Tool in the Tool Section of the menu.
Simply press start and the message will read: Take photo of featureless white object 10 cm from lens. Focus will be set to infinity.
The SensorKlear Cleaning Tool Set-Up
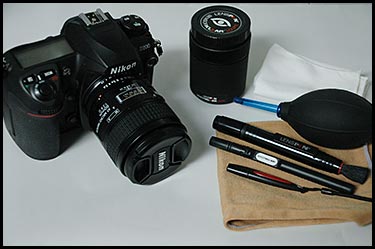
Set-Up for Sensor Cleaning: Camera Nikon D200, SensorKlear Loupe, LensPen Lint Free Cloth, Hurricane Blower, LensPen with Brush for Exterior Lens Cleaning, SensorKlear Pen, and CellKlear Pen.
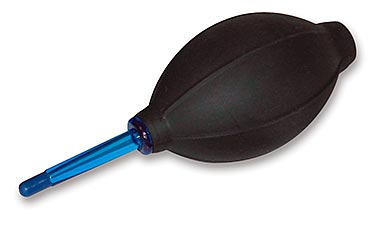
The SensorKlear Hurricane Blower
The Hurricane Blower
The SensorKlear Hurricane Blower provides the first step in cleaning the sensor and should be used whenever changing lenses.
This non-toxic rubber bulb is tear proof and resistant to low and high temperatures if you are at remote locations. A double-valve design prevents the bulb from breathing in dust and refills quickly between squeezes.
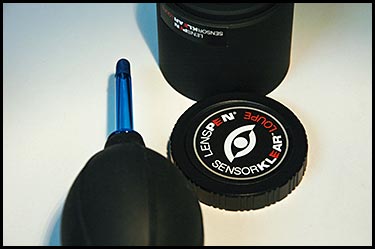
The LensPen Hurricane Blower and SensorKlear Loupe
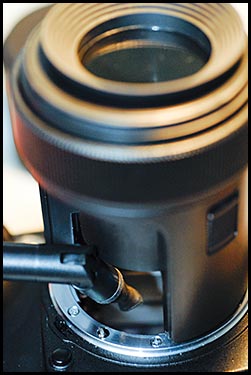
The SensorLoupe
The SensorLoupe
The SensorLoupe is a device that rests on top of the lens mount and allows me to see the sensor with a 6x magnification and it has three long-life 1.5 volt LR44 batteries that powers the 4 LED's that illuminate the entire chamber while cleaning. It comes with a cap, a fully protected case that covers the entire loupe, and a padded drawstring case like my lens cases.
The cut-out opening on the side of the SensorLoupe allows the new SensorKlear Pen to fit through it for accessing the camera sensor while looking through the loupe.
There is also a screw for adjustments in height for viewing other camera body types.
Exterior Camera Cleaning
The CellKlear Pen is small enough for cleaning the view finder and your iPhone camera lens.

Lenspen CellKlear
The CellKlear Pen Kit
The CellKlear Pen is just the right size for cleaning my Nikon D200 view finder. And the enclosed MicroKlear Microfibre Cloth wipes dust, fingerprints and smudges from the display screen easily.
Try the CellKlear on your iPhone camera lense! This tool is small enough to keep any phone camera lens clean and ready for that quick shot.
The LensPen
The LensPen has a handy retractable dust removal brush on one end and a special non-liquid cleaning element on the other. Its circular shape allows the tip to get into the edges of the lens to insure complete cleaning of smudges, fingerprints and dust. (See answers to FAQ on the LensPen.)
The Environment
I cleared and dusted a 36" x 24" area to lay out all the equipment for cleaning the interior and exterior of my Nikon D200.
The Equipment
1 lint free wiping cloth
1 lint free glass cleaning cloth
Nikon D200
SensorKlear Loupe
Hurricane Blower
LensPen
SensorKlear Pen
CellKlear Pen
high intensity lamp
Dust Removal
Dust removal will be the first step to cleaning your camera.
My Nikon D200 has a Mirror Lock-Up Mode in the Tool Section.
Choose it and click the shutter button and you will hear the mirror locking into place.
Remove the lens and set it aside with a cover on both ends.
Hold the camera body in one hand facing downward and with the Hurricane Blower held in your other hand just outside the lens mount opening, but not touching the inside, give several squeezes to force out any dust in or on the sensor area.
DO NOT TOUCH the interior chamber with the nozzle of the Hurricane Blower.
HINT:Depending on how often you change lenses, this is probably a good maintenance step to do once or twice a month to keep dust particles cleared our to the sensor chamber.
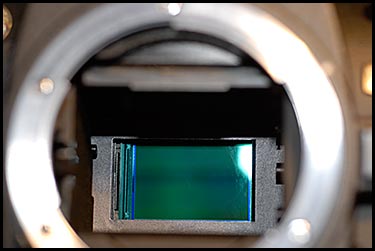
My Nikon D200 Sensor with the Mirror Locked Up
View the Sensor
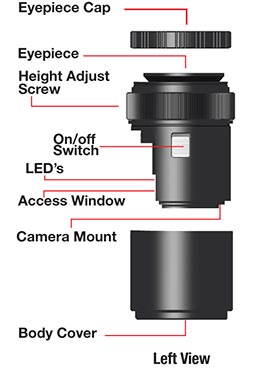
Lay the camera body on it's back and remove the SensorKlear Loupe's Cap and Shield.
Turn the SensorKlear Loupe's LED Lights Switch on.
Position the Loupe over the lens mount and look through the magnification loupe to see the sensor clearly.
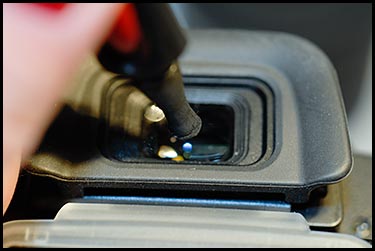
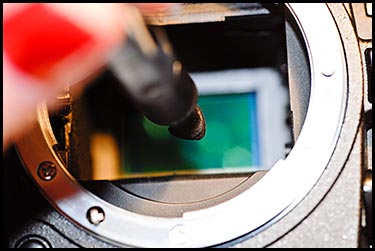
SenorKlear Loupe sitting on top of the camera body with the SensorKlear Pen bent at a 45 degree angle to reach the sensor plate.
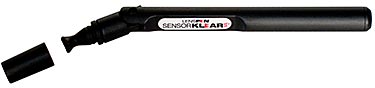
The LensPen SensorKlear Pen
The SensorKlear Pen
Give the SensorKlear Pen two twists clockwise and remove the cap.
Bend the SensorKlear Pen at a 45 degree angle and insert inside the opening on the SensorKlear Loupe.
In a circular motion, starting at the middle of the sensor, begin to clean the sensor.
Use a medium-firm circular motion to clean the surface of the sensor working from the inside out.
As you approach the corners, use the triangular shape in a straight motion to clean the corners of the sensor.
Use small circular motion with medium pressure and stay only on the sensor plate.
Don't be too heavy handed, but some pressure will be needed to get all the dust, oil and debris removed from the sensor.
If you are intimidated with this step, try using a LensPen on one of your lenses and clean it. You will see how much pressure is needed and how efficiently the LensPen works. Remember, the SensorKlear Pen is working the same way, but is designed to fit the corners of the sensor and it seems a bit more flexible in the tip stem.
Try not to move off the sensor edges with the SensorKlear Pen as you clean its surface. This could cause you to pull oils or grease from the other parts onto you sensor.
Once finished, replace the cap onto the SensorKlear Pen and twist clockwise two times.
Pick up the camera body and tilt it toward the floor and use the Hurricane Blower once more to blow out any graphite or dust particles.

Image AFTER First Cleaning with the SensorKlear Pen & Loupe

Image of Sensor AFTER THIRD Cleaning with the SensorKlear Pen
Check Your Work
Replace your lens and take another photograph to see if the sensor is clean.
My first attempt at cleaning the sensor was timid and you can see that it looks like I made more dirty spots.
I repeated the SensorKlear Pen THREE times before getting a perfectly clean sensor. On the third cleaning, I removed the SensorKlear Loupe and cleaned the entire surface of the sensor with the SensorKlear Pen using circular motions up to and into all the corners. The result was a perfectly clean sensor!
I felt so confident that I cleaned Rob-ART's Nikon D70s. His is much older than mine and it took 5 passes to get his sensor clean.
Clean the Exterior
Use the LensPen Brush tip to dust off the exterior rim of the lens mount and the areas surrounding the buttons.
Clean the interior and exterior lens areas with the LensPen.
Mount the lens to the camera body.
Use the brush to dust the eye piece and use the CellKlear Pen to clean the small eye lens.
Buff the LCD screen with the lint free towel and you are good to GO!
Recommendation
It's my opinion that although it takes more than one attempt, the SensorKlear Pen is a quick, easy, and environmentally safe to perform in any setting. The Sensorklear Pen has refill cartridges that can be replaced as needed. LensPen says that you can safely use them 50 times before replacing, but I think I'll change mine more often for sensor cleaning.
Keep the entire line of LensPen Products in your camera bag. They take up little room, can be used and carried anywhere, and little or no negative effects will result in their use. Just a clean clear sensor for less corrections during production.
I recommend cleaning your sensor only as needed. Don't get carried away!
DISCLAIMER: Clean at Your Own Risk
Although I recommend the SensorKlear Pen and Loupe for sensor cleanings, BareFeats.com, Betty Morgan, and Robert Morgan assume NO RESPONSIBILITY for any damage to your sensor or camera during the cleaning process described.
WHERE TO BUY:
Order direct from LensPen.com
Related Links:
Cleaning Digital Cameras
Cleaning Sensors (by Calumet Photo)